
Rendering Part 1
Photo Reference

Where We Left Off
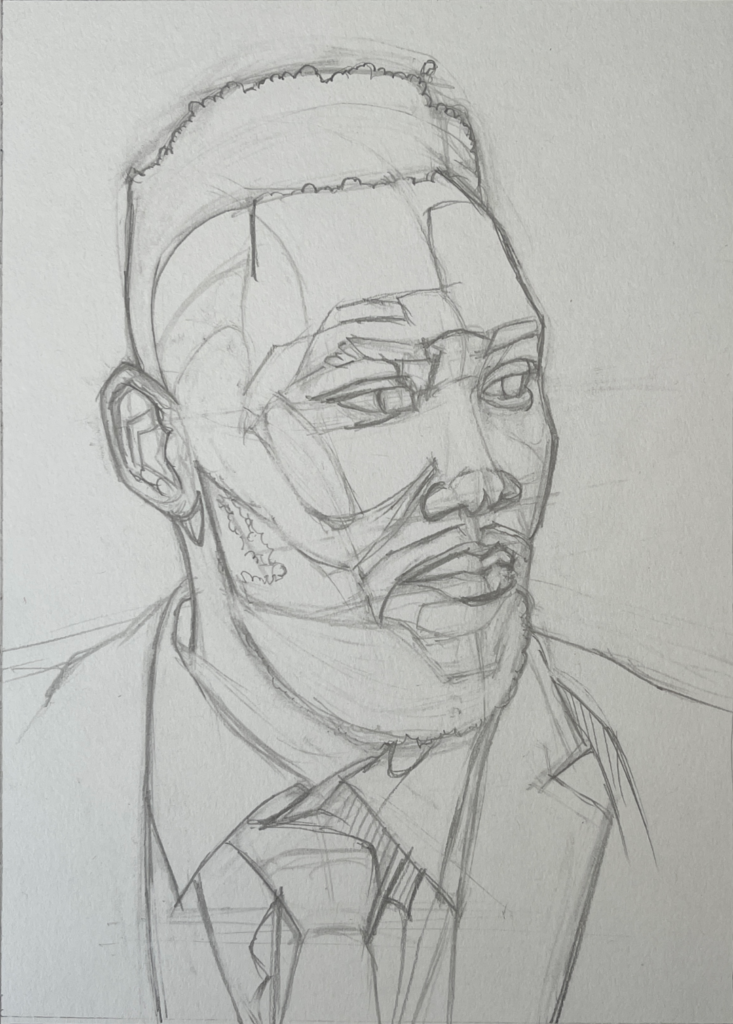
This is the completed linework for the drawing. The contours are laid in, and I even have the planes and value shapes mapped out.
I will now begin rendering.
An Explanation of the Circular Stroke
But first, I want to explain what I’ll be doing differently this time.
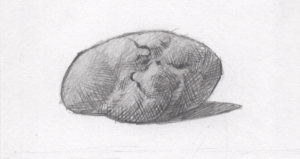
I will be using continuous shading. If you read my last post, I used crosshatching. This time, I will be using a different kind of pencil stroke: the circular stroke.
Here’s an example:

When I say “circular”, I’m talking about the motion of the pencil; I do not want to literally draw a circle, leaving a hole on the inside. If anything, the strokes are elliptical. And I’m doing my best to make the shape that I’m technically drawing with each stroke filled and solid.
I will use this stroke throughout the entire drawing. Depending on how big I’m working, this may take a long time, but it’s worth it for the finished result. I’m actually working small here so this won’t take too long.
Beginning the Shading
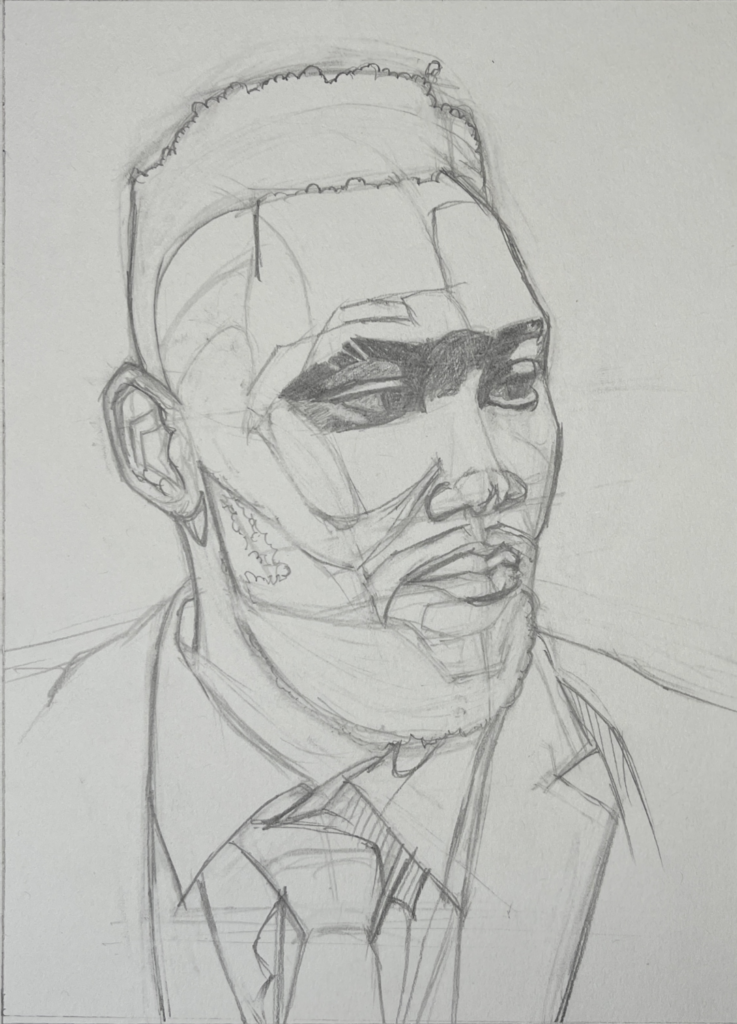
I’m going to start in the area around the eyes. No particular reason. I’ve seen other artists start with the area around the eyes, so I sort of picked that up.
I’m starting with the hardest leads I have: 4H, 2H, and H.
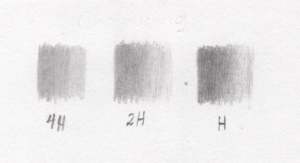
I have a reason for this: the harder leads hold a point much more easily. Keeping a sharp tip is important to filling in the paper tooth. If I were to start with the softer B leads, I’ll end up with larger holes in coverage – flecks of white paper showing through the graphite.
And aside from that, I like to build the darks a little more slowly for better control of the process.
I intend to push the darks using the softer leads later.
The Ins and Outs of Continuous Shading
Layering, Blocking In, and Blending
Before we continue, I’m going to explain how I shade using continuous shading.
I build value using light to moderate pressure, layering the graphite. You can build tone more quickly by using heavier pressure, but I prefer to do it this way because it affords me the most control over value. You don’t want to go too hard too soon and find you’ve driven the graphite into the paper fiber and can’t completely erase anymore.
Other than that, I find in building slowly, I can take the time to give the shading a smooth appearance.
In order to shade the way I do, I constantly keep the pencil tip sharp. If I don’t do this, the holes in the paper tooth show through more, as my pencil tip can’t reach into those valleys of the paper tooth as well as it dulls. This is an unpleasant and undesired appearance.
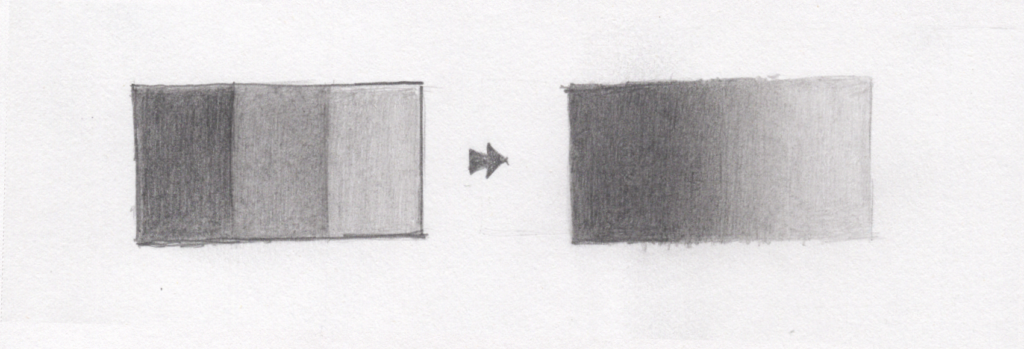
I like to block things in. That means I fill in shapes that have hard edges at first.
Later, I will soften the edges by blending. The way I blend is I use the circular strokes to darken the edge nearest the darkest shade gradually tapering the tone out into the lighter shade. Once again, I do so in layers, patiently building the graphite until it looks like one tone blends into the other smoothly.
When you do this, you create the appearance of a soft edge or a blend.
As long as you don’t draw a hard line anywhere, the graphite will give the appearance of one area of value blending seamlessly into another.
The Kneaded Eraser
An invaluable tool of a graphite artist is the kneaded eraser. The kneaded eraser unlike a rubber or plastic eraser can lift graphite very gradually. You can dab it onto the paper and only pull up a little graphite. This way, you won’t have to completely build a shade from scratch if you need to erase it due to a mistake. A kneaded eraser will allow you to fine tune your values.
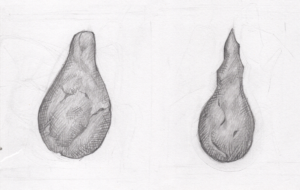
A kneaded eraser can be shaped like putty. This can be useful when you need it to take on a shape for a tight area on the drawing.
In order to get the smooth appearance I want in continuous shading, I have to use my kneaded eraser fairly frequently.
As you shade, you’ll notice graphite builds unevenly – you get little dots or blotches of darker tone that stand out from the surrounding area.
This is due to how paper tooth works – paper tooth has peaks and valleys. The graphite on the tip of your pencil will catch more on the peaks of the paper tooth, while the valleys of the paper tooth may catch less graphite.
In this case, I shape my kneaded eraser more into the pointed shape you see in the picture above and go after all those little dots of uneven, darker tone.
Using Layering and the Kneaded Eraser Together
To get the appearance I want, I’ll be going back and forth between layering and lifting graphite.
As I said, I may have to go after little speckles of uneven graphite with the kneaded eraser. Usually, you may take away more graphite than you expect, so the answer to that will be to layer the graphite back up carefully with light pressure and a sharp tip.
And when it comes to blending, if something doesn’t look like it’s blending well enough, it may be a matter of needing to lighten the lightest end of the transition (the area of blending) a little more with the kneaded or a matter of darkening the darkest end of the transition a little more with gentle layering.
I may even need to go back and forth a few times until I think the transitional area looks like it’s smooth enough.
Continuing the Eyes
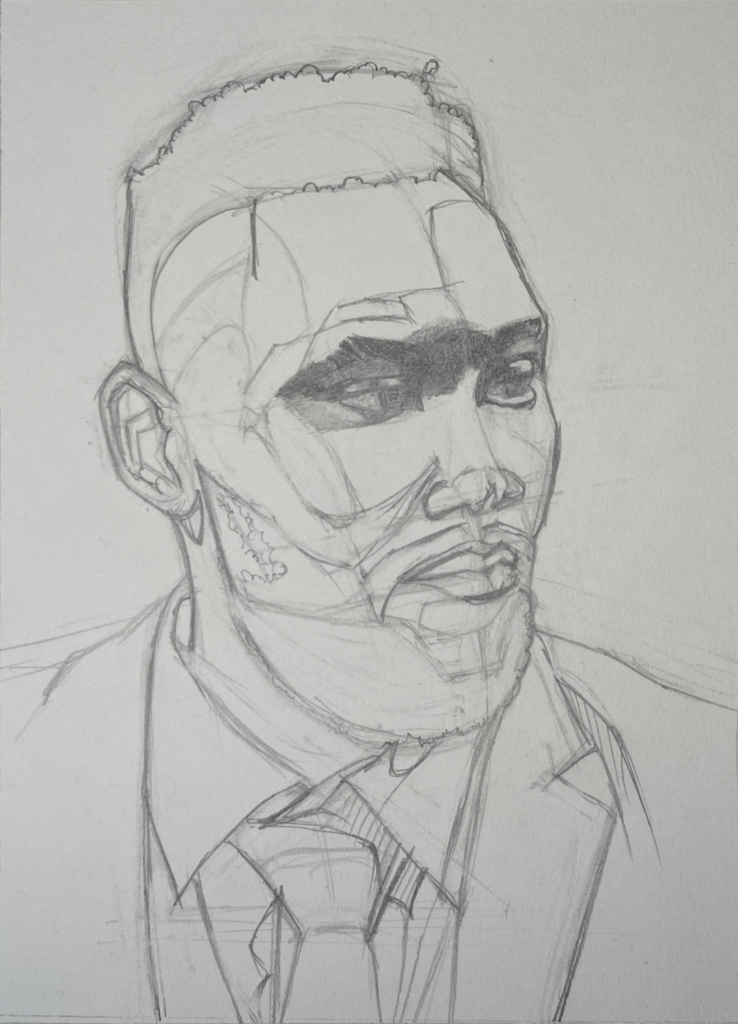
Now, I’m going to fill in holes in the paper tooth. This means wherever you see the white paper poking through, you fill it in using a sharp tip. Again, the harder leads will keep a sharp tip for longer than the softer B grades.
I’m using a 4H for this process. Aside from keeping a sharp tip, using a hard and light grade like 4H will control how much darker I make the shading.
If I were to use a relatively darker grade like 2H or H, I might find I’m darkening the shading too much.
It’s a little bit of a conundrum because I want the paper to be filled – that’s when continuous shading looks best in my opinion – but I certainly don’t want to go past my intended value.
That’s where the H grades come in. The H grades will allow you to fill up paper tooth without darkening by a lot.
This has to do with the ratio of clay to graphite in the lead. The higher the number in the H grades, the more clay there is, therefore the lighter the darkest dark you can get with the pencil will be.
Now, let’s say I’ve overdarkened a shade. The H grades will only limit how dark you can get a shade, but it’s still possible to go past the shade you want, even if by only a little bit. When this happens, I use my kneaded eraser.
I shape my kneaded eraser into whatever shape I need for an area and dab away at the errant value. After this, I may need to darken the value a little bit back up because you usually take away more graphite than you want. But I make sure not to darken past a certain point again.
If I’m sure I need a darker lead because the 4H won’t cover the way I want, I switch to one. I begin filling any holes in coverage with the darker H leads 2H and H here.
Modeling the Eyes

In modeling, I darken values, lift them out with the kneaded when things get too dark, and repeat the process as needed until things look right to me.
If there’s still any gaps in coverage, I go after them with a sharp tip and with the grade of H lead I think is appropriate for the job.
Pushing the Darks
Last thing I want to do for now is to push the darks. I take a 2B and strengthen the darkest shadows I see in the reference.
We will move across the face region by region in the coming posts.
Other Posts in This Series
- Demonstration: Portrait in Graphite no. 2 (1) Line Drawing
- Demonstration: Portrait in Graphite no. 2 (3) Rendering Part 2
- Demonstration: Portrait In Graphite no. 2 (4) Rendering Part 3
- Demonstration: Portrait in Graphite no. 2 (5) Rendering Part 4
- Demonstration: Portrait in Graphite no. 2 (6) Rendering Part 5
- Demonstration: Portrait in Graphite no. 2 (7) Rendering Part 6
- Demonstration: Portrait in Graphite no. 2 (8) Finishing the Drawing