Line Drawing
Reference Photograph
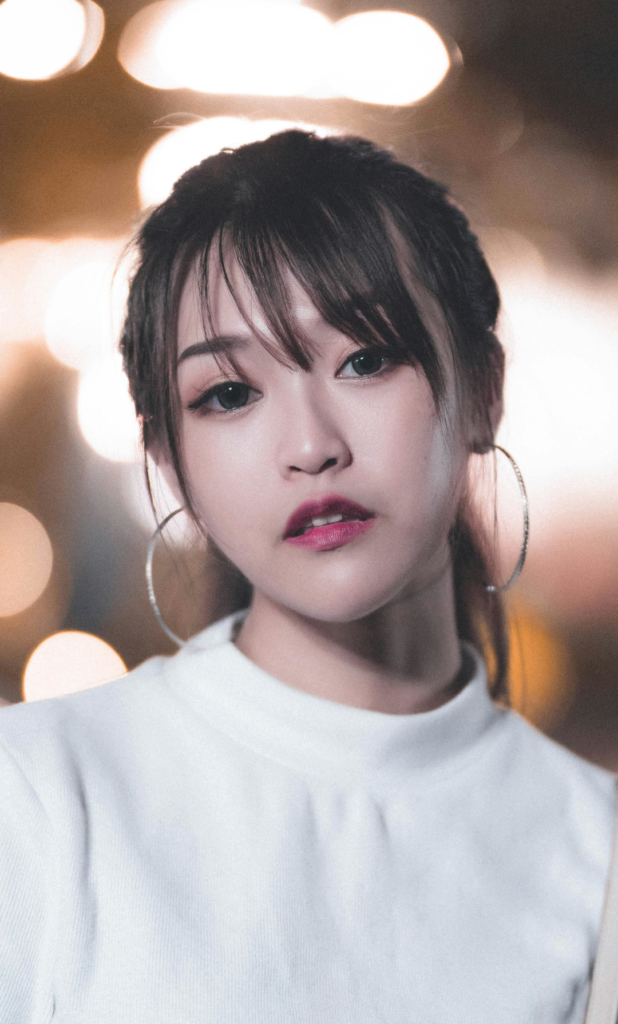
This will be our subject for this drawing. The lighting for this model is coming mostly from the front to her right. I note that the shadows have a secondary light source illuminating them, keeping them from being extremely dark.
For me, the challenge of this drawing will be properly representing the soft appearance the model has. This is in contrast to the male models I have been drawing so far.
Abstraction

We begin the abstraction with the classic egg shape of the head.
The model’s head is tilted. I have to make sure I get that tilt in correctly when drawing the head. Any variation in that tilt will be noticeable to both me the artist and the viewer.
I hold up my pencil and use plumb and level to visually judge the tilt of the head in the reference, making sure the tilt of the head in my drawing reflects it.
Only one side of the face will be shadowed. In preparation for that, I draw a line that indicates where the form will start turning away from the light. I will draw over it later to correct any shadow and value shapes that I need to.
The clothes are fairly simple, so I indicate them at this stage.
Placing Features

I indicate the eyes, the nose, and the mouth.
I’m especially careful about placement here. In the past, I’ve gotten things wrong such as the spacing between the nose and the mouth. Something like this can be especially challenging to me when the subject has their mouth open slightly, like our model here does.
When I’m satisfied with everything, I move on.
Beginning to Develop the Features

Here, I’m going to refine the features a little bit. I’m not completely contouring them, giving them final details yet, but I am going to smooth out the linework a little bit.
I indicate the irises here.
With the nose, I draw a few cross-contour lines to remind myself of the roundness of the nose. Of course, I will erase this later.

Cross contour goes across the form in contrast to the outside contour, which can be said to be the outline of the shape.
With cross contour, you use your eyes and imagination together. If you could draw a line across the form, where would the line go as it travels across the form? You would see it turn and go back in space (here, I mean away from the viewer) as the form does. It would curve as the form does.
Aside from the features, I put in an indication of the hair just a little bit. Hair can be challenging. I especially want to landmark the strands that stand out, the way they frame the features.

The Intermediate Stage

I finish putting in the initial blocking-in of the hair.
Again, I’m going to make sure the bangs frame the features properly as they do in the reference photo as they fall across the face. Certain things need to be showing through the holes in the bangs.

I also draw the contour of the hair at the top.
When I do this, I try to look at the biggest divisions I see, make them as proportional to each other as I can – they shouldn’t be too big or too small. If I’ve made them too big, other shapes won’t fit in in other areas of the outline. If they’re too small, they won’t seem to connect to other shapes in the hair properly.
If I really need to, I can check the alignments of the shapes in the hair’s outline with other features in the face with plumb lines to make sure I’m placing things properly.
I’ve also indicated the hoop earrings a little bit.
I continue on with the intermediate stage of the drawing. And while I’m not at the finishing stage at this point, I’m going to put in a few more details here.

I put in the pupils of the eyes and the highlights.
I’ve drawn in the eyelashes to be shaded in later.
I also start to draw in the shapes of the shadows and values across the drawing.
Very small fixes on the mouth. The lips didn’t look right, I had to redraw them a little bit, pushing them in from the model’s right side.


I refine the shape of the nostrils.


There are a few more shapes to the hair I have to put in. Negative spaces where the skin and the eyebrows show through. I’m not concerned with making these shapes completely faithful to the reference photo, but I want them to give the same impression as they do in the photo.

The hoop earrings are a challenge. Each one is tilted in a different direction (here, I mean depthwise), so the ellipses they form will be different. I keep that in mind as I draw them. I try to smooth out the curvature of the earrings best I can at this point.

You’ll notice I begin drawing the shapes of the folds of the clothes here. I try to take note of how the forms of the folds roll and curve in space. I’ll need that for later when I’m shading them in.

When I’m done with everything, I roll a kneaded eraser over the drawing to lighten the linework.

Finishing Up the Linework

I’m going to go over my lightened lines again, trying to steady my hand, make the contouring as smooth as possible.
Even at this stage, there are still mistakes to fix, details left to be put in.
The hair was hugging the head a little too closely, I needed to move its top edge up a little to have room to put in the details of the hair later.

I needed to push in the right side of the jaw and cheek. I had made it bulge out a little too much.


From there, I redrew the lips again. And that’s just a hazard in drawing – sometimes, you will just need to redraw something over and over again until you get it right. This time, I redrew the lips in a more confident shape and pushed in the right side of the mouth even more.
One of the last things I do at this stage is indicate areas of light and dark on the hair. This will help later on in rendering. When I draw the shapes of the light and dark on the hair, I don’t worry too much about individual strands I see on the photo, I simply indicate a shape with a pattern that suggests the detail of the hair.

Final Thoughts
The linework for this drawing is complete. It’s not perfect, but all I need is for the linework to be good enough for the next stage rendering. What I’ll do is refine it at the end after rendering is done like I did for Portrait in Graphite no. 1.